I think there's a lot of truth to this. I got some quarter sawn, right grain bloodwood (2900 psi) that I'm anxious to try out on an upcoming rebuild. It carves really nicely.
Original Message:
Sent: 09-27-2025 13:15
From: Chris Chernobieff
Subject: Downbearing Bridge Cap Thickness Tool
I and other wise rebuilders have successfully eliminated false beats by using a harder bridge cap material. I use Osage(2800psi), Hickory(1800psi), and even ash (1600psi). Erwin uses Jotoba(2600 psi), and Truitt uses another very hard species. Boxwood(2900psi) would probably be the best because its easy to carve. But i found the other species can be carved as well with good sharp tools. Hard rock Maple was most likely chosen because it too is easy to carve, but i cannot find hard rock maple that's really hard like it was a 100 years ago. I'm thinking the older Hardrock was around 1800psi, today its 1400psi. When you go above that however, you hear a big difference. You should try it, if you haven't already.
xoxo
-chris
------------------------------
On the page, it looked....nothing.
The beginning, simple, almost comic.
Just a pulse - bassoons, basset horns, like a rusty squeezebox. And then suddenly, high above it..an oboe, hanging there unwavering, until a clarinet sweetened it into a phrase of such delight.
This was no composition by a performing monkey!!
865-986-7720 (text only please)
Original Message:
Sent: 09-27-2025 12:49
From: Roger Gable
Subject: Downbearing Bridge Cap Thickness Tool
David,
Thank you for that extensive explanation and illustrations. I'm glad to see that someone is cognizant of the perils of improper front to back downbearing angle. It appears the only unknown for the rebuilder is calculation/guessing what the outcome will be under load.
During my false beat research, I became acutely aware of these pitfalls of the piano bridge cap design. Understanding these pitfalls can inspire one to imagine various means to alleviate these shortcomings post restringing. My first brainstorming tool design and methodology has shown promise but not practical during a typical service call. I hope to enable technicians to eliminate false beats up to and including note 88. Knowing the physics of the vibrating string and its relationship to the bridge could make this possible.
------------------------------
Roger Gable RPT
Gable Piano
Everett WA
(425) 252-5000
Original Message:
Sent: 09-23-2025 19:48
From: David Love
Subject: Downbearing Bridge Cap Thickness Tool
As promised, attached is a pdf in follow up to Roger Gable. This hopefully answers some of those questions. I don't think the front/rear bearing issue is a problem if you approach it the right way. I'm more convinced that problems between front and rear bearing are more a matter of poor planing that poor planning. But there are always multiple ways to screw things up. I'll probably end up using this as part of a more comprehensive outline for future class but you are welcome to it.
------------------------------
David Love RPT
www.davidlovepianos.com
davidlovepianos@comcast.net
415 407 8320
Original Message:
Sent: 09-22-2025 17:10
From: David Love
Subject: Downbearing Bridge Cap Thickness Tool
Roger,
I think the answer to your question is a little bit more nuanced but outcomes are not as random as is being represented. There's a simple method of determining the rear bearing in advance which yields the height of the backside of the bridge as well as the front side of the bridge from which distance bearing can be measured.
There variations on outcomes that you see, I can't say are the product of design flaws or execution flaws. You can certainly calculate the bridge height, front and back, correctly, and then plane the bridge to the wrong height.
I would say the two most important aspects of downbearing are, first, that it distributes the load across the bridge somewhat uniformly, second, that the front bearing is positive. Having positive front bearing and negative rear bearing isn't necessarily a a problem and I would not say that bearing issues are necessarily responsible for false beats, though that's another discussion. Negative front bearing certainly is responsible for tonal issues, however,
I will draft a follow up set of illustrations to show methods for determining front and rear bearing in advance, it's really quite simple, not a mystery, and I'll post that as soon as I can, but I need to do it off of this platform.
Others than that, I can't say that different manufacturers don't have different down bearing targets, they might. But I think there are fundamental guidelines that transcend any differences between manufacturer's, executions not withstanding.
------------------------------
David Love RPT
www.davidlovepianos.com
davidlovepianos@comcast.net
415 407 8320
Original Message:
Sent: 09-22-2025 11:00
From: Roger Gable
Subject: Downbearing Bridge Cap Thickness Tool
Chris and all,
That may explain why most new low-cost Asian pianos (I frequently measure them as they are unboxed) have a zero or negative rear downbearing. They cover their ass on the front side by sacrificing the positive bearing on the rear.
To reiterate my question; Are rebuilders targeting a 1.5-degree total downbearing resulting in a .75-degree balanced front to back? I ask this because I also see new pianos with 1-to-1.5-degree downbearing on both sides.
------------------------------
Roger Gable RPT
Gable Piano
Everett WA
(425) 252-5000
Original Message:
Sent: 09-21-2025 14:04
From: Chris Chernobieff
Subject: Downbearing Bridge Cap Thickness Tool
I think Roger asked an excellent question. I believe what is being alluded to is the top angle of the bridge cap. When set (sanding/ planing)on the bench its a horrible guessing game. Using the string to measuring the gap at the string rest puts a different angle on the the bridge cap than when the board is loaded in its final position) making the front of the bridge slightly lower than the back. My take of what Roger is saying is that when the front is lower than the rear, that constant lift on the front pins causes false beats. When i visited other rebuilding shops in the early days, this topic come up a few times, and i saw that the bridge cap angle was set with a gap in the rear from the string test angle to compensate for load, which is a mitigated guess.
chris
------------------------------
On the page, it looked....nothing.
The beginning, simple, almost comic.
Just a pulse - bassoons, basset horns, like a rusty squeezebox. And then suddenly, high above it..an oboe, hanging there unwavering, until a clarinet sweetened it into a phrase of such delight.
This was no composition by a performing monkey!!
865-986-7720 (text only please)
Original Message:
Sent: 09-20-2025 14:35
From: Roger Gable
Subject: Downbearing Bridge Cap Thickness Tool
David and all,
I've been reading this thread and find I must have missed something in this conversation, or I need to go back and read something like, "Setting Downbearing for Dummies"
The major methodology expressed is to wedge a variable spacer to imitate the final height of the bridge cap when targeting a down bearing angle of approximately 1.5 degrees net (total) angle. Loaded or unloaded board is not my point of confusion. My confusion is the 1.5 degrees, or any angle deemed appropriate to obtain the target down bearing. Where or how do you measure the degree? Is the target angle measured at the front edge of the spacer, the rear edge of the spacer or the middle edge of the spacer. When measured at the middle of the spacer as 1.5 degrees then logic would have each edge, assuming a balanced front and rear angle, to be .75 degrees. Carrying that net 1.5-degree net downbearing logic through could place a 1.5-degree angle on one side and 0 degrees on the opposite side.
Given the new findings of the causes of false beats, the ideal angles should be balanced front and back, although variations of off-balance are common without noticeable negativity. I have viewed many new pianos (mostly from low-cost Asian manufactures) exhibiting false beats when there is an approximately 1 to 2-degree net down bearing but with a negative angle on one side -- especially negative on the speaking side. In that scenario the manufacturer met the 1.5 net downbearing rule but with an extremely tilted bridge cap.
How does one avoid this trap?
Roger
------------------------------
Roger Gable RPT
Gable Piano
Everett WA
(425) 252-5000
Original Message:
Sent: 09-18-2025 22:07
From: David Love
Subject: Downbearing Bridge Cap Thickness Tool
As far as I know the 1.5° comes from the idea that the downbearing should be 1/40 of the string tension. That means for160 pounds of tension on the average plain wire string, a target that seems to have been a common one among early 20th century designers, 4 pounds of DB per string (160/40). That translates to 1.5 degrees, the sine of which is .026 * 160 lbs = 4.16 lbs. That seems to have been empirically derived but appears in the original "Piano Tone Building" collection (and other places), the one that Del Fandrich recently annotated.
If you extrapolate that out for a piano that has 32,000 pounds of overall tension that means a total downbearing load of about 800 pounds, modifications on the bass bridge notwithstanding. If you follow the notion of minimal DB on the bass bridge then the load can be calculated on a 26 bass piano as 62 (the number of plain wire unisons) x 3 x 4.16 or 774 lbs, plus whatever the bass bridge contributes.
In the case of higher tension scales that number goes up, of course, and you would expect a more robust SB structure to accommodate. But the 1.5 degrees does have some basis.
------------------------------
David Love RPT
www.davidlovepianos.com
davidlovepianos@comcast.net
415 407 8320
Original Message:
Sent: 09-18-2025 14:24
From: Norman Brickman
Subject: Downbearing Bridge Cap Thickness Tool
Thanks all for the insight! DavidL, on page 29 in the April 1988 issue Nick says: "All in all, however, a plus or minus 1.5 degree angle of deflection on a suitably crowned soundboard has been a proven source of quality piano tone through mechanical exploitation of soundboard compression". But I suspect that he meant the phrase the way you said it, not literally how it is written. That Baldwin Accu-just pamphlet makes interesting reading. Regards, Norman
------------------------------
Norman Brickman
Potomac Piano Service
Potomac, Maryland
potomacpiano@verizon.net
https://potomacpiano.com
(301) 983.9321
Original Message:
Sent: 09-18-2025 14:06
From: David Love
Subject: Downbearing Bridge Cap Thickness Tool
OA Watson
I don't disagree with that procedure, for the most part. I also set the bearing uniformly across the board at 1.5 degrees except on the bass bridge which I set not more than .5 degrees (double thickness of the loop wire and felt on the bass plate shelf considered. I don't feel comfortable going to zero (as David Hughes suggested--pretensioned measured) as any significant drop in the EMC resulting in a loss of crown can be a problem. Sine of 1.5 degrees times the length of the backscale is the SOP for determining distance bearing.
Instead of the stack of punchings I simply use the Mazzaglia gauges which are designed for that purpose.
The wedge I use is in place of the stretched string and cutting the slots in the already capped bridge, otherwise, same principle.
I don't wedge the board down to simulate DB but just to take some slack out of the board first.
In the end you don't want any negative bearing, certainly, setting more uniform bearing helps prevent that since the load on the bridge gets distributed to adjacent areas of the board.
------------------------------
David Love RPT
www.davidlovepianos.com
davidlovepianos@comcast.net
415 407 8320
Original Message:
Sent: 09-18-2025 13:18
From: O.A. Watson
Subject: Downbearing Bridge Cap Thickness Tool
The technique that has worked well for me is this: I don't use the tool shown above, but hey my method works for me. I don't turn my nose up at someone else's tool or method. First the sound board, bridges, pinblock, and plate all need to be glued or screwed into the piano in their original locations (according to location jigs and measurements). If pre break down measurements show forefinishing issues a good time to fix it is before the PB is glued in. (string heights etc.) Every component in its final position will ensure the highest degree of accuracy and elimination of stacking error when setting down bearing.
Measure the distance from samples of the speaking bridge pin notes to the first thing the string touches on the plate. Multiply this distance by .02617 (sin of 1.5 degrees). The answer will tell you how much DB each sample will require. The non speaking section of string behind the bridges is short in the treble and longer in the tenor and bass. This means your stack of punchings will be short in the treble and tall in the bass. I glue front rail punchings together in a stack to create the distance that was calculated. This method means that all notes will have 1.5 degrees of DB. I pull a thick string (not wire and its close to the same thickness as music wire) from the agraffe over the bridge and to the area where the string touchs the plate. I place the stack of glued punchings on top of the place where the strings touch the plate (in front of the hitch pin, include duplex bars). I remove material from the bridge cap until the string touches the top of the bridge cap and the stack of punchings at the same time. Once this checks for all notes DB has been set.
I drive a wedge between plate struts and the bridge cap to simulate DB load into the sound board. I do not use a hammer to drive it in. I have questioned the accuracy of this loading procedure due to the unknown degree of loading for each board. One thing that has helped me is to measure height of SB at a specific note before strings are install and once again after strings are installed and brought up to pitch. This information helps me understand how much different makes and models of piano respond to DB loading (My new sound boards only). I can adjust the wedge to simulate this amount according to each piano make and model.
------------------------------
O.A. Watson
Watson Piano Works
San Marcos TX
(512) 757-5556
Original Message:
Sent: 09-15-2025 14:30
From: David Love
Subject: Downbearing Bridge Cap Thickness Tool
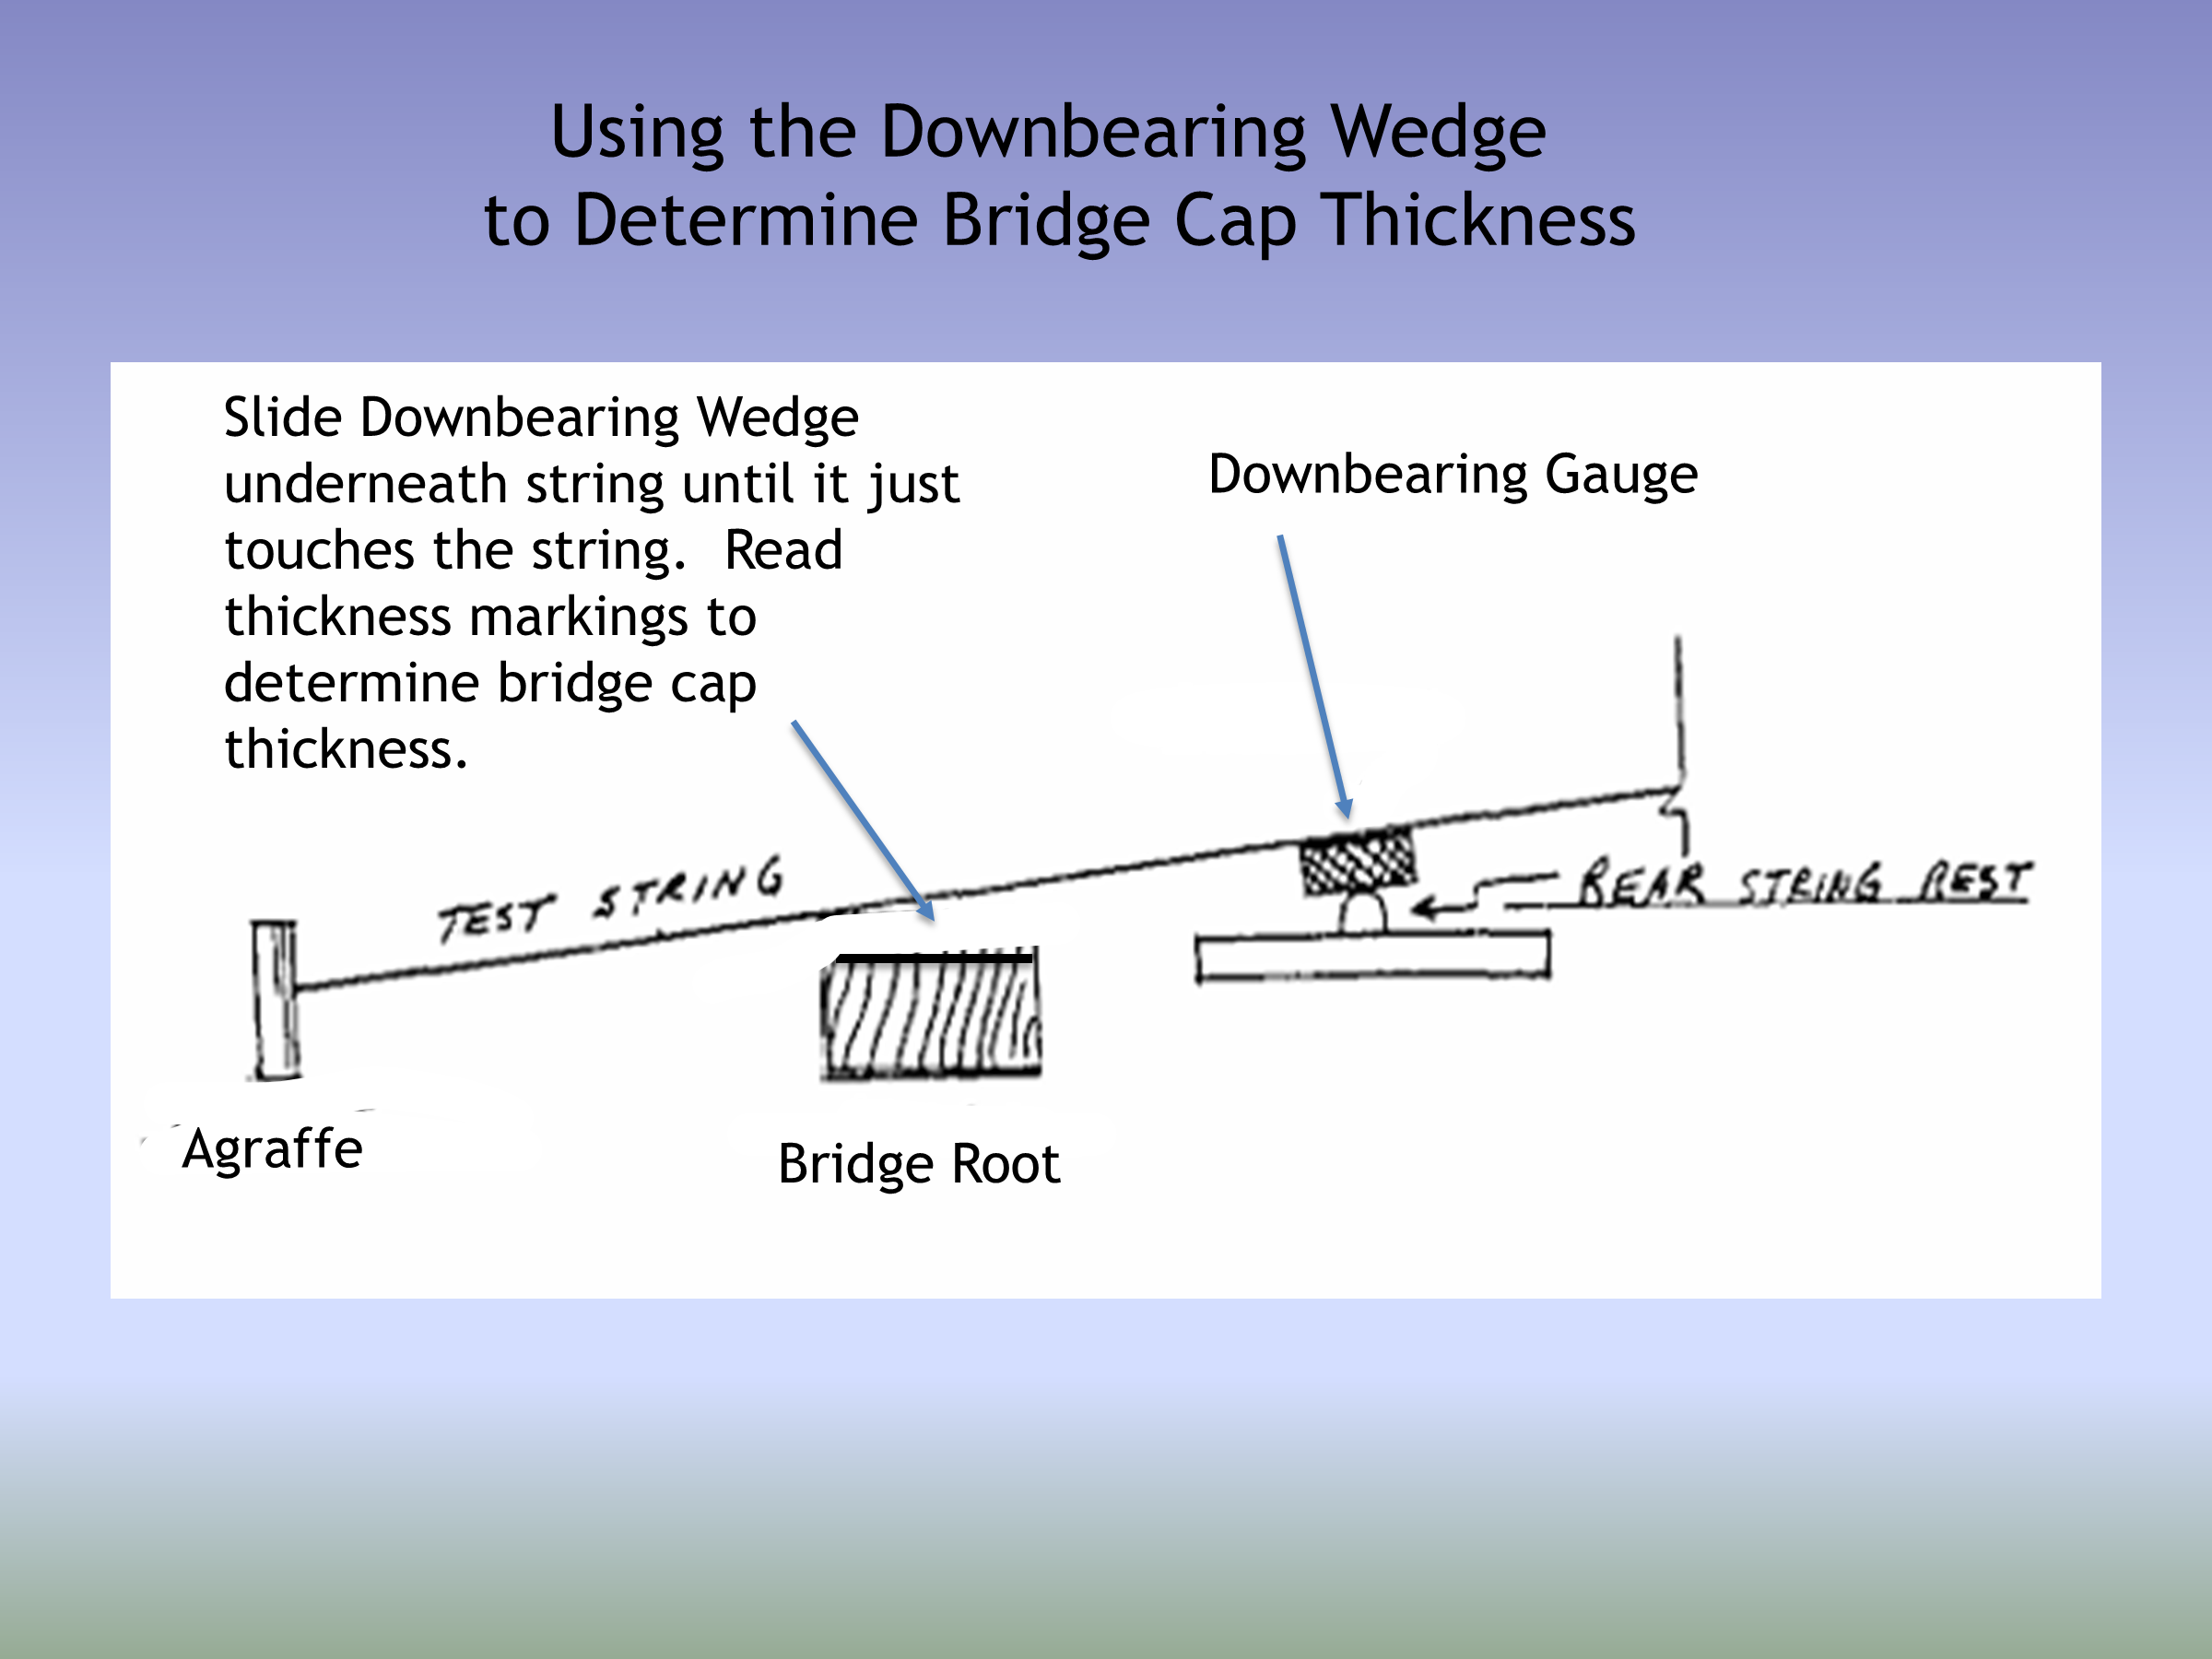
In a recent discussion with a colleague I was conveying my method of determining bridge cap thickness in advance of gluing on the new cap material. This way I can plane the new cap to the proper thickness before gluing it on. I find that easier, and more accurate, than the traditional method of gluing on an oversize (thickness) cap and then cutting slots in the top and then planing the bridge to the depth of those slots.
The pictures below are pretty self-explanatory. I've sent a suggestion to Mazzaglia that they produce something like this out of brass, like their other fine tools. But you can make one of these out of wood easily enough. I actually found a metal wedge on line which was exactly these dimension that I use for this purpose, adding the markings myself. The width of the wedge corresponds to the average spacing between the bridge pins.
Here's a link to the item I purchased recently after my original wooden wedge that I had made got damaged. Bueyfolt 1/2" x 3/4" x 4" Flange Wedge, Zinc Plated Metal Flange Wedge Pipe Fitting Welding Tool, Strong Welding Wedge, Rust-Proof, Corrosion Resistant and Strong, Spreading Flanges Triangle Tool - Amazon.com
Procedurally, you determine the distance bearing at the rear string rest by multiplying the length of the backscale by .0175 for each 1 degree of distance bearing that you want (.0175 is the sine of 1 degree). I then use the Mazzaglia bearing gauges set on top of the rear string rest and lower the string until it rests on the gauge/string rest and then slide the wedge under the string until it just touches the string. Read the thickness and that's the bridge cap thickness. By adding the cap thickness to the bridge root height it will give you how high the top of the cap should be above the SB. I then write in pencil directly on the SB at that point the target height of the bridge with the cap. I then plane the cap material to that target plus 1 mm and sand the cap to the final height. Lay out the bridge pin array and go from there.
I always pre-stress the board by inserting some wedges under the struts of the piano to "take out the slack" before I take the measurements. .

------------------------------
David Love RPT
www.davidlovepianos.com
davidlovepianos@comcast.net
415 407 8320
------------------------------